Presenting The Family History Guide to Others: 40 Things to See
For trainers, one of the unusual aspects of presenting The Family History Guide website to others is that there is no slide deck involved; you simply show and explain the website.
That leads to a few questions:
- What elements do you show on the website?
- What sequence do you follow on the site?
- What are some good talking points for what you show?
Let’s explore these questions, with the help of a new training aid: 40 Things to See (and Show) in The Family History Guide. This Word doc is available in the Presentations option of the Train menu on the website, with further explanations and details.
What Do You Show?
The “40 Things” PDF lists the essential items to cover in a 50-minute presentation of The Family History Guide. It’s a great introduction for most learners, and you can customize it if needed for your presentations.
Here’s a look at the first two sections of 40 Things:
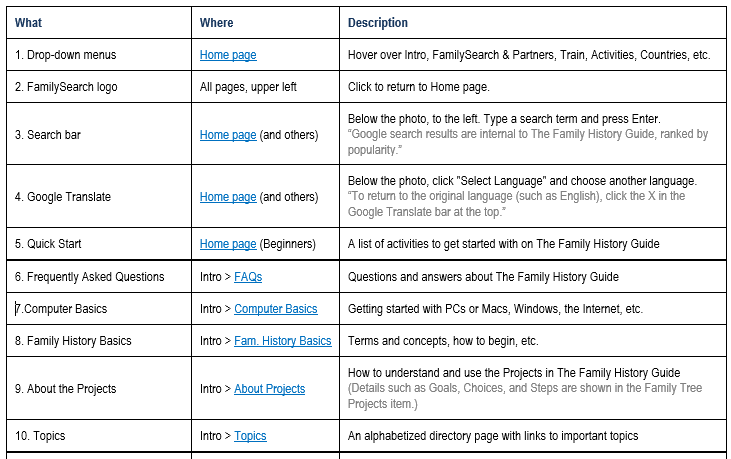
The left column lists what to show; the middle column describes where to find the elements (links are provided for study convenience; they need not be clicked in the actual demo); and the right column describes what to do.
What’s the Sequence?
That’s easy – you just go from number 1 to number 40, in order. You can add a minute or two at the beginning to introduce The Family History Guide; see About The Family History Guide on the site for ideas.
Notice how the order follows the website menus, from left to right on the site. For example, the first 4 items in the list above focus on the Home page; then the next 6 items are covered in the Intro menu. Each section in 40 Things moves through the next available menu to the right, on the website.

What Else Do I Say?
Did you notice the gray text in the first picture above? Brief talking points are included in quotes; you can add your own as needed. Also, tips and instructions for your presentation are included in parentheses.
There are two versions of 40 Things on the Presentations page of the website: one is for presenting, and the other is for attendees. The attendee version is the same, except it leaves out the gray text that’s designed for presenters.
Be sure to check out the Presentations page for more ideas on how to use “40 Things to See and Show in The Family History Guide” and see how easy and enjoyable your presentations can be!